How To Draw A Horse: A Complete Beginner's Guide
Have you ever wanted to capture the majestic beauty of a horse on paper but felt intimidated by the complexity of equine anatomy? You're not alone! Many aspiring artists find drawing horses challenging, but with the right guidance and step-by-step approach, anyone can learn to create stunning horse drawings. In this comprehensive tutorial, we'll break down the entire process into manageable steps that even complete beginners can follow.
Drawing horses doesn't have to be overwhelming. By starting with simple shapes and gradually building up to the final details, you'll be amazed at how quickly your skills improve. Whether you want to sketch a powerful stallion, a graceful mare, or an adorable foal, this guide will walk you through every stage of the drawing process.
Why Drawing Horses Is Both Challenging and Rewarding
Horses are fascinating subjects for artists because of their dynamic forms, expressive features, and rich cultural significance. Throughout history, horses have been central to art, appearing in everything from ancient cave paintings to modern digital illustrations. Their powerful muscles, flowing manes, and elegant movements make them both challenging and incredibly rewarding to draw.
- Sean Hannity New Wife
- Ashleelouise Onlyfans Nude Photos Leaked Full Uncensored Video Inside
- Leaked Porn Found In Peach Jars This Discovery Will Blow Your Mind
The good news is that horses can be simplified into basic geometric shapes, making them much more approachable for beginners. Once you understand the fundamental structure, you can build upon it to create increasingly detailed and realistic drawings. This tutorial will show you exactly how to do that, step by step.
Getting Started: Essential Materials and Preparation
Before diving into the actual drawing process, let's talk about what you'll need. The beauty of learning how to draw a horse is that you don't need expensive materials to get started. Here's what we recommend:
- A good quality drawing pencil (HB or 2B is perfect for beginners)
- Drawing paper or a sketchbook
- An eraser (preferably a kneaded eraser for more control)
- A pencil sharpener
- Optional: colored pencils or markers if you want to add color to your finished drawing
You might also want to print out reference images of horses in different poses. Having visual references will help you understand proportions and details as you work through the tutorial. Many beginners find it helpful to keep a collection of horse photos for inspiration.
- Elijah Schaffers Sex Scandal Leaked Messages That Will Make You Sick
- The Sexy Side Of Baccarat Leaked Methods To Win Big On Baccaratnet
- Leaked The Trump Memes That Reveal His Secret Life Must See
Understanding Basic Horse Anatomy
Before we start drawing, it's helpful to understand the basic structure of a horse. Horses have a distinctive body shape that can be broken down into several key parts:
The head is relatively small compared to the body, with a long muzzle and large, expressive eyes. The neck is long and muscular, connecting to a deep chest and powerful shoulders. The back is relatively straight, leading to a rounded hindquarters. Horses have long, slender legs with distinct joints, and a flowing tail that can be drawn in various positions depending on the horse's movement.
When you're learning how to draw a horse, remember that all horses share these basic proportions, even though different breeds may vary in size and build. Quarter Horses tend to be more muscular, while Arabians have finer features and longer necks.
Step-by-Step Horse Drawing Tutorial
Now let's dive into the actual drawing process. We'll break this down into 13 simple steps that will take you from a basic outline to a complete, colored drawing.
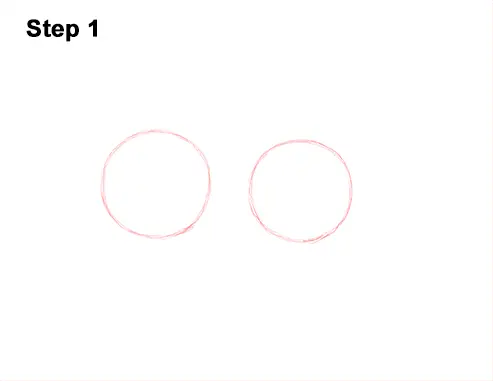
Step 1: Drawing the Basic Shapes
Start by sketching a large oval for the body and a smaller circle for the head. Connect these with a curved line that will become the neck. This might look nothing like a horse yet, but these basic shapes form the foundation of your drawing. Think of it like building a house – you need a solid framework before adding the details.
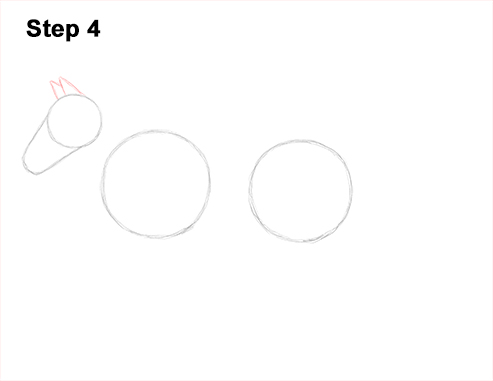
Next, add a smaller oval for the muzzle and a triangle for the ear. These simple shapes help you establish the correct proportions before you commit to more detailed lines. Don't press too hard with your pencil – these are just guidelines that you'll refine later.
Step 2: Outlining the Head and Neck
Now that you have your basic shapes, it's time to create the actual outline of the horse's head and neck. Follow the curves of your initial shapes, but make the lines more fluid and natural. The neck should flow smoothly from the head to the body, showing the characteristic arch that horses have.
Pay attention to the angle of the head – is your horse looking straight ahead, to the side, or slightly down? This will affect how you draw the features. Most beginners find it easier to start with a side view, as it shows the horse's profile clearly.
Step 3: Adding the Body Structure
With the head and neck in place, expand your drawing to include the main body. Connect the neck to the body oval smoothly, showing the powerful shoulder muscles. Add a curved line for the back, which should flow naturally from the neck to the hindquarters.
Remember that horses have a distinctive body shape – their backs are relatively level, and their hindquarters are rounded and muscular. This is especially noticeable in breeds like Quarter Horses, which are known for their powerful rear ends.
Step 4: Drawing the Legs
Horse legs can be intimidating for beginners, but they're actually quite simple when broken down into basic forms. Start by drawing straight lines for the front legs, adding small circles to indicate the joints. The back legs are slightly more complex, with a characteristic "S" curve in the upper portion.
A key tip for learning how to draw a horse is to remember that horse legs are much longer than they appear at first glance. The actual body of the horse sits relatively high off the ground. Pay attention to the angles of the joints – they should look natural and capable of supporting the horse's weight.
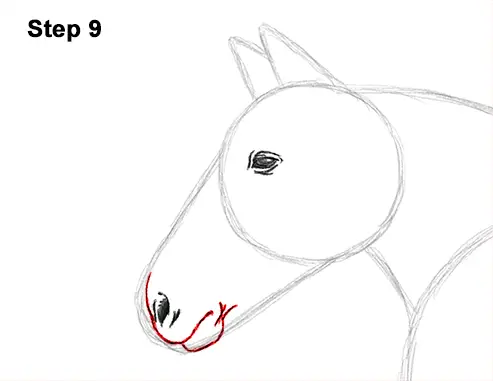
Step 5: Creating the Facial Features
Now let's add some personality to your horse by drawing the facial features. Start with the eyes – place them about one-third of the way down from the top of the head. Horse eyes are large and expressive, often showing a lot of white around the iris.
Add the nostrils, which are shaped like commas or parentheses, and the mouth, which should have a gentle curve. Don't forget the ears – they should be proportional to the head and can be positioned to show whether the horse is alert, relaxed, or listening to something specific.
Step 6: Adding the Mane and Tail
The mane and tail give your horse character and movement. For the mane, decide whether you want it to be short and tidy or long and flowing. Draw the mane along the top of the neck, using quick, confident strokes that suggest individual hairs.
The tail can be drawn in various positions – hanging naturally, swishing to the side, or raised in excitement. Use flowing lines to create the tail, making it fuller at the top where it connects to the body and tapering toward the bottom.
Step 7: Refining the Outline
At this point, you have all the basic elements of your horse drawing in place. Now it's time to go over your sketch and refine the lines. Erase any unnecessary guidelines from your initial shapes, and smooth out any rough edges.
Pay attention to the proportions as you refine – sometimes what looks right in a rough sketch needs adjustment when you're creating the final outline. This is where having reference images really helps, as you can compare your drawing to real horses.
Step 8: Adding Muscle Definition
To make your horse look more realistic, add some subtle muscle definition. Use light, curved lines to suggest the contours of major muscle groups – the shoulders, chest, hindquarters, and along the neck. You don't need to draw every muscle; just enough to give the impression of a strong, athletic animal.
Think about where the light would naturally hit the horse's body and where shadows would fall. This will help you create a more three-dimensional appearance.
Step 9: Drawing the Hooves
The hooves are an important detail that many beginners overlook. Draw them as slightly rounded triangles at the bottom of each leg. Add a small line to indicate the hoof wall and a slight depression where the sole would be.
Make sure the hooves are proportional to the legs and that they're all facing the correct direction based on your horse's pose. This small detail can make a big difference in how realistic your drawing looks.
Step 10: Adding Texture and Detail
Now let's add some texture to make your horse come alive. Use short, quick strokes to suggest the direction of hair growth on different parts of the body. The coat is generally smoother on the face and legs, while the body and mane have more pronounced texture.
You can also add some shading to create depth. Think about where the light source is coming from and add darker areas where shadows would naturally fall – under the belly, along the legs, and in the areas where different body parts meet.
Step 11: Creating the Final Outline
Go over your entire drawing one more time, darkening the lines you want to keep and smoothing out any rough areas. This is your chance to fix any proportions that still seem off and to make sure all the elements work together harmoniously.
Don't be afraid to make adjustments – even experienced artists often need to refine their work multiple times before they're satisfied with the result.
Step 12: Adding Color (Optional)
If you want to add color to your horse drawing, now is the time! Horses come in many beautiful colors and patterns, from solid blacks and bays to spotted Appaloosas and golden Palominos. Choose colors that appeal to you, or try to match a specific breed or individual horse.
Start with light layers of color and gradually build up to darker areas. Pay attention to how light affects the color – areas in direct light will be brighter, while shadowed areas will be darker and may have different undertones.
Step 13: Final Details and Highlights
The final step is to add any last details that will make your drawing really stand out. This might include highlights in the eyes to make them sparkle, fine lines to suggest individual hairs in the mane and tail, or subtle shading to enhance the three-dimensional quality of the drawing.
Step back and look at your completed horse drawing. You've created something beautiful from simple shapes and lines – that's quite an accomplishment!
Common Mistakes and How to Avoid Them
As you learn how to draw a horse, you might encounter some common challenges. Here are solutions to problems many beginners face:
One frequent mistake is making the legs too short or too thick. Remember that horse legs are quite long and slender, especially below the knee and hock joints. Another issue is getting the proportions wrong – the head might be too large compared to the body, or the neck might be too short.
Don't worry if your first few attempts don't look perfect. Drawing is a skill that improves with practice, and every artist develops their own style over time. The key is to keep practicing and learning from each attempt.
Exploring Horse Art History and Inspiration
Horses have been featured in art for thousands of years, from prehistoric cave paintings to contemporary digital art. Understanding this rich history can provide inspiration for your own work and help you appreciate the cultural significance of horses in art.
In ancient art, horses often symbolized power, freedom, and nobility. Medieval European art frequently depicted horses in battle scenes and royal portraits. The Renaissance brought more realistic portrayals of horses, with artists like Leonardo da Vinci studying equine anatomy in detail.
Modern artists continue to find new ways to represent horses, from realistic wildlife art to abstract interpretations. Looking at how different artists have approached horse subjects can give you ideas for your own creative explorations.
Taking Your Horse Drawing Skills Further
Once you've mastered the basics of how to draw a horse, there are many ways to expand your skills:
Try drawing horses in different poses – running, jumping, or interacting with humans. Each pose presents new challenges and helps you understand equine movement better. You might also experiment with different art mediums, such as charcoal, watercolors, or digital drawing tools.
Consider studying specific horse breeds, as each has unique characteristics that can make your drawings more accurate and interesting. You could also try drawing horses from life by visiting local stables or farms, which provides invaluable experience in observing real horses.
Practice Makes Perfect
Remember that learning how to draw a horse is a journey, not a destination. Even professional artists continue to learn and improve throughout their careers. The most important thing is to enjoy the process and celebrate your progress along the way.
Set aside regular time for practice, even if it's just 15-20 minutes a day. Keep a sketchbook dedicated to horse drawings, and look back occasionally to see how much you've improved. Don't be afraid to experiment with different styles – you might discover that you prefer a more cartoon-like approach or a highly detailed realistic style.
Conclusion
Drawing horses can be incredibly rewarding once you understand the basic principles and techniques. By breaking down the process into simple steps, anyone can learn to create beautiful horse drawings, regardless of their previous experience. Remember to start with basic shapes, pay attention to proportions, and gradually add details as you build confidence.
The key to success is patience and practice. Don't get discouraged if your first attempts don't look exactly as you imagined – every drawing is a learning opportunity. Keep practicing, study real horses when you can, and most importantly, have fun with the process!
Whether you're drawing for relaxation, artistic expression, or to improve your skills, learning how to draw a horse opens up a world of creative possibilities. So grab your pencil, find some reference images, and start your horse drawing journey today. You might be surprised at how quickly you progress and how much joy you find in creating these magnificent animals on paper.